背景介绍
正如我们所知道的textarea是一个行内块元素display: inline-block并且它的默认宽高由cols&rows决定, 也就是说textarea的height并不会自适应于内容长度.
textarea的宽高是如何决定的?参考张鑫旭的文章HTML textarea cols,rows属性和宽度高度关系研究
那么, 我们今天的任务就是来思考如何创建一个高度内容自适应的textarea组件,我将介绍三种思路实现高度内容自适应的textarea,具体代码textareaAutoSizeSolutions
方案概要
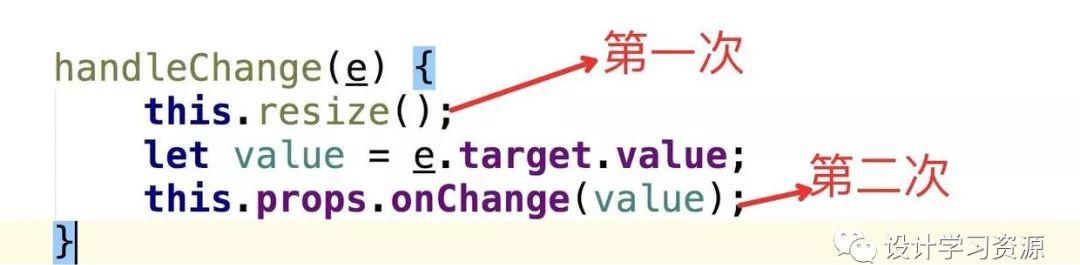
方案一: 两次调整 textarea.style.height
textarea的onchange触发resize方法,下面是resize方法的逻辑
textarea.style.height = ‘auto’;// 1. 让 textarea 的高度恢复默认textarea.style.height = textarea.scrollHeight ‘px’;// 2. textarea.scrollHeight 表示 *textarea* 内容的实际高度
方案二: 利用一个 ghostTextarea 获得输入框内容高度, 再将这个高度设置给真实的textarea
textarea构建时创建ghostTextarea,onchange触发resize方法:
创建textarea的时候, 同时创建一个一模一样的隐藏 ghostTextarea;
ghostTextarea 的属性全部克隆自textarea, 但是 ghostTextarea 是隐藏的, 并且ghostTextarea.style.height = 0; 也就是说 ghostTextarea.scrollHeight 就是textarea中内容的真是高度。
resize 方法处理流程:
textarea.value先设置给 ghostTextarea,
拿到ghostTextarea.scrollHeight
将textarea.style.height = ghostTextarea.scrollHeight
方案三: 使用 (div | p | …).contenteditable 代替textarea作为输入框
div是块级元素, 高度本身就是内容自适应的(除非设置max-widthormin-widht) 使用contenteditable让div代替textarea, 省去各种计算高度的逻辑。
方案对比
满分3分, 三种方案通过优化, 在用户体验和兼容性上都能达到满分. 因此差别仅仅在于这几个方案的实现难度. (仅仅是基于 react 组件的实现复杂度). 方案对比:
毫无疑问方案一是最优选择, 多加1分以示奖励;
方案一两次调整 textarea.style.height实现思路
渲染一个textarea元素
<textarea ref={this.bindRef} className={style[‘textarea’] ‘ ‘ className} placeholder={placeholder} value={value} onChange={this.handleChange} // 看这里/>
textarea的onChange事件触发resize
handleChange(e) { this.props.onChange(e.target.value); this.resize(); // 看这里}
resize事件的实现
// 重新计算 textarea 的高度resize() { if (this.inputRef) { console.log(‘resizing…’) this.inputRef.style.height = ‘auto’; this.inputRef.style.height = this.inputRef.scrollHeight ‘px’; }}
注意componentDidMount的时候, 执行一次resize方法, 初始化textarea的高度哦.
优化点
避免两次渲染,造成内容抖动
在react中, 组件receiveProps的时候会render一次, 直接调整textarea的height也会浏览器的重绘,那么就会造成两次重绘, 并且两次重绘的时候,textarea的内容可能会发生抖动.
优化思路:先触发resize后触发render用最简单的思路完美解决问题
方案二: 利用一个 ghostTextarea 获得输入框内容高度, 再将这个高度设置给真实的textarea实现思路
同时渲染两个textarea, 一个真实textarea一个隐藏textarea
return ( <div className={style[‘comp-textarea-with-ghost’]}> <textarea // 这个是真的 ref={this.bindRef} className={style[‘textarea’] ‘ ‘ className} placeholder={placeholder} value={value} onChange={this.handleChange} style={{height}} /> <textarea // 这个是 ghostTextarea className={style[‘textarea-ghost’]} ref={this.bindGhostRef} onChange={noop} /> </div>)
初始化的时候拷贝属性,初始化必须使用工具方法将textarea的属性拷贝到ghostTextarea去. 因为textarea的样式再组件外也能控制, 因此初始化的时候 copy style 是最安全的。
这是所以要拷贝的属性的列表:
const SIZING_STYLE = [ ‘letter-spacing’, ‘line-height’, ‘font-family’, ‘font-weight’, ‘font-size’, ‘font-style’, ‘tab-size’, ‘text-rendering’, ‘text-transform’, ‘width’, ‘text-indent’, ‘padding-top’, ‘padding-right’, ‘padding-bottom’, ‘padding-left’, ‘border-top-width’, ‘border-right-width’, ‘border-bottom-width’, ‘border-left-width’, ‘box-sizing’];
这是 ghostTextarea 的隐藏属性列表:
const HIDDEN_TEXTAREA_STYLE = { ‘min-height’: ‘0’, ‘max-height’: ‘none’, height: ‘0’, visibility: ‘hidden’, overflow: ‘hidden’, position: ‘absolute’, ‘z-index’: ‘-1000’, top: ‘0’, right: ‘0’,};
这是拷贝style的工具方法
// 拿到真实 textarea 的所有 stylefunction calculateNodeStyling(node) { const style = window.getComputedStyle(node); if (style === null) { return null; } return SIZING_STYLE.reduce((obj, name) => { obj[name] = style.getPropertyValue(name); return obj; }, {});}// 拷贝 真实 textarea 的 style 到 ghostTextareaexport const copyStyle = function (toNode, fromNode) { const nodeStyling = calculateNodeStyling(fromNode); if (nodeStyling === null) { return null; } Object.keys(nodeStyling).forEach(key => { toNode.style[key] = nodeStyling[key]; }); Object.keys(HIDDEN_TEXTAREA_STYLE).forEach(key => { toNode.style.setProperty( key, HIDDEN_TEXTAREA_STYLE[key], ‘important’, ); });}
textarea的onChange事件 先 reize 再触发 change 事件
handleChange(e) { this.resize(); let value = e.target.value; this.props.onChange(value);}
textarea的 resize 方法
resize() { console.log(‘resizing…’) const height = calculateGhostTextareaHeight(this.ghostRef, this.inputRef); this.setState({height});}
calculateGhostTextareaHeight 工具方法
// 先将内容设置进 ghostTextarea, 再拿到 ghostTextarea.scrollHeightexport const calculateGhostTextareaHeight = function (ghostTextarea, textarea) { if (!ghostTextarea) { return; } ghostTextarea.value = textarea.value || textarea.placeholder || ‘x’ return ghostTextarea.scrollHeight;}
优化点避免两次渲染,造成内容抖动
在react中, 组件receiveProps的时候会render一次, 给textarea设置height属性也会浏览器的重绘.那么就会造成两次重绘, 并且两次重绘的时候,textarea的内容可能会发生抖动.
下面两种思路, 在 demo 中均有体现
优化思路一: 合并祯渲染
使用window.requestAnimationFrame&window.cancelAnimationFrame来取消第一祯的渲染, 而直接渲染高度已经调整好的textarea;
优化思路二: 减少渲染次数
利用react批处理setState方法, 减少rerender的特性; 在textarea onChange方法中同时触发两个setState;
更多优化思路
页面存在多个textarea的时候, 能不能考虑 复用同一个ghostTextarea
方案三: 使用 div.contenteditable 代替textarea实现思路
渲染一个div.contenteditable=true
return ( <div className={style[‘comp-div-contenteditable’]}> <div ref={this.bindRef} className={classname(style[‘textarea’], className, {[style[’empty’]]: !value})} onChange={this.handleChange} onPaste={this.handlePaste} placeholder={placeholder} contentEditable /> </div>)
使用div.innerHTML会出现以下两种问题:
&会被转码成&
空白符合并 使用div.innerText在低版本 firfox 上要做兼容处理.
因此使用哪种方式主要看需求.
placeholder 的实现:
div的placeholder属性是无效, 不会显示出来的, 现存一种最简单的方式, 使用纯css的方式实现div的placeholder
.textarea[placeholder]:empty:before { /*empty & before 两个伪类*/ content: attr(placeholder); /*attr 函数*/ color: #555;}
优化点去除支持富文本
div.contenteditable是默认支持富文本的, 可能会以粘贴or拖拽让输入框出现富文本;
监听 div 的 onPaste 事件
handlePaste(e) { e.preventDefault(); let text = e.clipboardData.getData(‘text/plain’); // 拿到纯文本 document.execCommand(‘insertText’, false, text); // 让浏览器执行插入文本操作}
handlePaste 的更多兼容性处理
几个大网站的高度自适应textarea对比
我分别查看了微博,ant.design组件库,知乎的自适应输入框的实现.
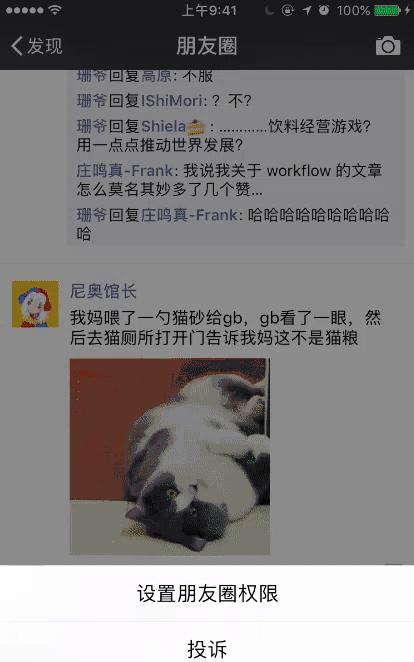
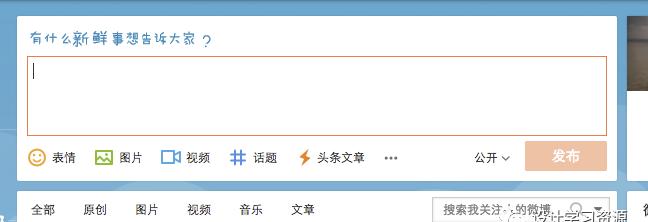
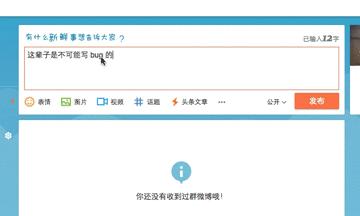
微博: 采用方案二
未输入时
输入后
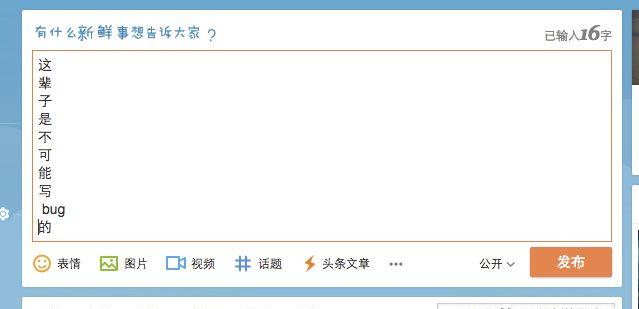
但是微博的实现存在用户体验上的缺陷,会抖动!!!
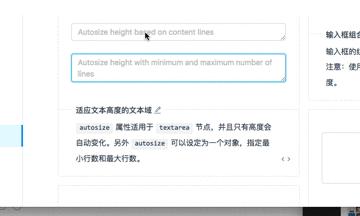
ant.design: 采用方案二
体验超级棒哦
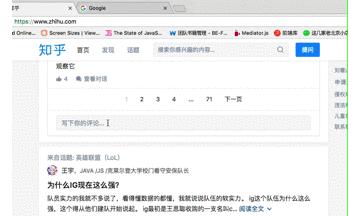
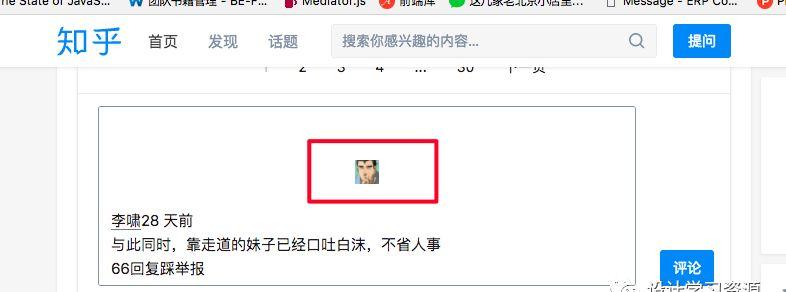
知乎: 采用方案三
看上去竟然存在 bug , 其实上面的截图也有